
Does your pantry tend to look like this?

Or do you have a hidden drawer kind of like this?

It’s okay to admit it, we do too ;). We re-use our plastic bags for lunches, trash can liners or returning the clothing our nieces and nephews leave at our houses (they never go home naked… why do we have half of their wardrobe?). But we never had a fun, cute and sassy way of storing them in our home. So here is our solution!

My Mom had one of these handy little grocery bag holders hanging in our pantry growing up. But we had yet to see one that we could buy, and we knew full well we could just make it! Here’s how:

1. Cut your strips of fabric into 8 pieces 4in, x 18 in. each. I used 4 different fabrics, 2 strips each. If you want to just use one piece of fabric cut it 28 in x 18 in. (If you do it with one piece of fabric skip to Step 4)
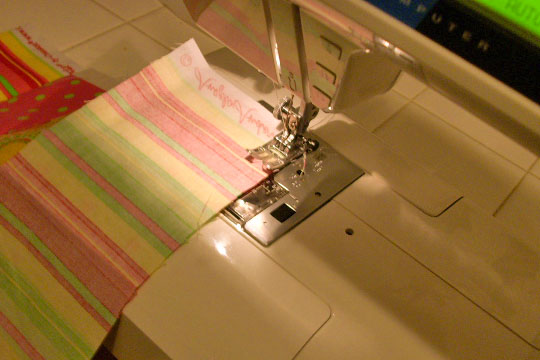
2. Start sewing your pieces together with the right sides together. I left about 1/4 in. seam allowance.

Make sure that you keep one edge lined up straight. I used the factory edge of my fabric and always start your sewing from your straight edge. The other side will probably not line up straight, it’s ok, we will fix it!

3. Sew a button hole on the side that you want to be the top. Put the button hole 1 ¼ in. to 1 ½ in. down from the top in the middle. Most sewing machines will sew the hole for you and then you just make a little snip in the fabric and you’re done! It’s really easy! Don’t be scared to really use your sewing machine. I practiced on some left over fabric before I did the real one. I'd never done it before either.

4. Fold the whole thing over the long way putting the right sides together and line up your straight edge with the shortest strip on the other side, then cut off everything that hangs over. Then, sew up the side. I did the same ¼ in. seam allowance.

5. Leaving the bag inside out fold over the top and the bottom an inch. I used ½ in. ribbon on mine.Iif you are going to use ribbon bigger or smaller just fold it over so it’s a ½ in. bigger than your ribbon. On the top sew all the way around, but you will need to leave about a 1 in. space open on the bottom to thread your ribbon through.

6. Now we are going to put the ribbon on! Take the end of your ribbon (don’t cut it off yet) and but a safety pin on it, or use a bobby pin and tie the ribbon to it. Then just slide it in the button hole and start fishing it through, When you get it out the other side pull it so there is about 10-12 in. on each side and the whole is not too bunched (you need to be able to stuff the bags inside it.). Tie a cut bow, and your just about done! Do the same thing with the ribbon around the bottom, here you do want the hole to be kinda small and bunched (so the bags don’t fall out, but you can easily pull them out).TTie a knot in the ribbon and let the rest hang.

7. Then take about 6in of ribbon fold it over like in the picture, and sew it to the bag. Cut off the lose threads and DONE!
We hope that you love yours as much as we love ours!
No more crazy drawers or scary pantries!


No comments:
Post a Comment